Raspberry White Chocolate Scones

Friday, September 12, 2014

One of my NYC Apartment Living habits is a regular audit of storage - purging my closet, throwing out clutter from under the bathroom sink, chucking Sephora samples that are 6+ months old and untouched. Most relevant to The Chardonnay Kitchen is my periodic review of the contents of our kitchen cabinets and formulation of plan to use things up.

I made Skinnytaste’s flag-styled fruit pizza back at the 4th of July and had some white chocolate chips hanging out. Yum. I know not everyone is a fan of white chocolate but I 100% am. I decided to dust off the best scone recipe on the planet and use them up, brightening them up with fresh fruit. Strawberries were the plan, but raspberries won out once I got to the store.


I wondered if Martha had made raspberry scones and found this recipe, too. I ended up mainly using the Fast Raspberry Scones recipe, incorporating the cream from the Cream Scones in lieu of buttermilk.

2 1/2 cups all purpose flour
1/4 cup sugar
1 tablespoon baking powder
1/2 teaspoon kosher salt
1 stick cold unsalted butter, cut into small pieces
3/4 cup light cream
1 egg yolk
6 ounces fresh raspberries
3/4 cup white chocolate chips


I got to use my food processor's dough blade for the first time - oh, the things that thrill me these days! - and it whipped the ingredients together in a snap. I added the white chocolate chips by hand once the dough was ready so the blade wouldn't smash up the chips. Once those were incorporated, I smushed the dough ball out onto my floured countertop and, per the recipe instructions, "sprinkled" the raspberries on top. I folded it over the top of the berries and the moment I pushed down on the dough I thought, “Shit, this is going to be white chocolate raspberry soup.” I folded the dough in half again and more raspberry juice oozed everywhere. Only semi-panicked, I added another ¼ cup or so of flour to dry everything out and just started molding blobs of hot pink dough into scone-ish shapes.


Sighing, I figured, “They’re pretty. They’ll cook or they’ll fall apart.”


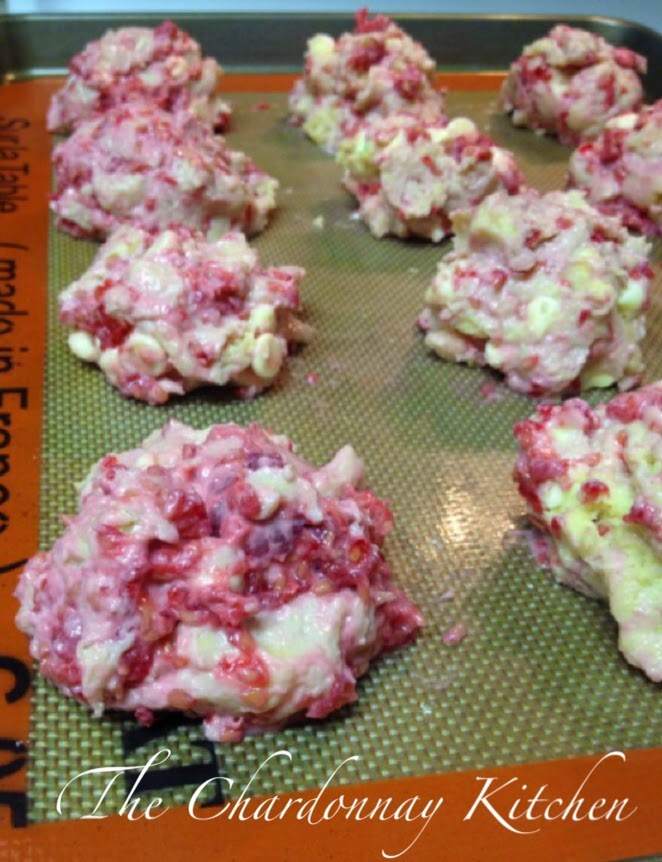
I put them in the 400 degree oven and checked them after 10 minutes. I finally took them out around Minute 12 when the edges were browned and a toothpick came out clean.


Nailed it.


They’re creamy inside. They’re fully cooked, yes, but somehow the fresh raspberry juice and the gooey chocolate make the otherwise crumbly scone taste creamy. They are amazing. They are admittedly sweeter and more moist than the Currant Scone recipe that I love for opposite reasons, but I added almost a cup of chocolate to them. And I loved every bite.


And I took MANY bites. The next day, I brought four of these to a girlfriend of mine and thank goodness I did - they are addictive. I ate them for breakfast, as post-dinner dessert, as a snack with a cup of hot tea. I think they'd be perfect to make around Valentine's Day because of their gorgeous color and assertive sweetness. Or, they'd be perfect for the next time I want to empty out chocolate chips from my pantry - to quote The A-Team, I love it when a plan comes together.

Parchment Paper Pesto Fish

Thursday, September 11, 2014

My mom cooked nightly when I was growing up. I think we maybe had takeout 10 times a year. She had her go-to meals and our regular favorites, but occasionally she brought out the big guns cookbooks and served up something exquisite and fancy. I vividly remember the day she made fillets of sole in parchment paper - flaky, buttery, and dainty. I thought about that meal when I came across this recipe and wanted to try the parchment paper preparation myself.

Just so we start off with a pretty picture, here's what went on top of the fish:


I went with tilapia because it was markedly cheaper than halibut. You top the fish with pesto sauce (store bought or re-used shiso pesto with a bunch of fresh basil zapped into the fray) and shredded carrots and zucchini. I went with yellow squash instead because the pesto was green enough and I like eating multi-colored foods.


I folded sheets of parchment paper in half and placed the fish along the fold. I didn't know why this was the instruction at the time, but having now cooked this dish, it's basically one less seam to have to crinkle. The recipe calls for us to "follow directions for heart-shaped parchment package below" and then... never explains that. So, I went with a kind of oblong-ish whatever that in no way looked like a heart. I was, as they say, winging it.


But it looked right! I made a bunch of little folds to seal the edges of the parchment paper together. They seemed sturdy when I moved them from my prep space to the cooking sheet so my confidence increased.

I also cut the recipe in half - I only made two fillets instead of four, and I skipped the extra olive oil and tablespoon of wine. I figured there was enough moisture in the vegetables and enough oil in the pesto to do the trick.

I cooked the two packets at 450° for 15 minutes or so. I then panicked because I couldn't count on my trusty meat thermometer to tell me if the fish was done or not. The packets themselves looked quite browned so I opened one up.


Perfection. The fish steamed perfectly with the barest trace of crispy edges. The pesto was spicy and fresh and the shredded vegetables added a sweet pop. I threw on a basil leaf for prettiness and served them up.


Paired with a fresh garden salad, this was a light but extremely satisfying dinner. It came together in less than 30 minutes and, since I used a very inexpensive type of fish, was fancy-looking and fancy-tasting on the cheap. I will certainly be trying more parchment paper recipes in the future - do you have any to recommend?

Rosemary Kalamata French Bread

Tuesday, September 9, 2014

I know we’re firmly in September at this point, but I have to confess that I did a LOT of baking in August. Brilliant, right? Turn on the oven and heat up the entire house during the hottest month of the year. In my defense, August was overall lovely and last week in NYC was Unbearably Hot. Plus, fresh baked goods are delicious!

After my first success with yeast, I got inspired to try more. I recalled a recipe for Dutch oven French bread over at Key Ingredients. The simplicity of prep appealed to me and baking the bread in a closed container (versus a baking sheet, for example) diffused fears of a Bread Blob oozing out of my oven.


Ever the Recipe Rule Breaker, I of course tweaked Allie’s straightforward ingredients. J and I love a restaurant in our neighborhood called T-Bar and their bread basket always includes pieces of olive-dotted focaccia. I had both pitted kalamata olives and fresh rosemary in my fridge and decided to toss those exquisite flavors into the mix as well.

4 cups all-purpose flour (Allie's calls for 2 cups AP and 2 cups whole wheat, of which I had zero cups)
1 teaspoon active dry yeast
1 teaspoon coarse sea salt
cooking spray
olive oil
1½ cups warm-water
1 tablespoon fresh rosemary, chopped
1 cup pitted kalamata olives

Using my stand mixer, I combined the flour, water, yeast, and salt with the dough hook attachment. After about 5 minutes, I also added the olives and rosemary. At that point I tried used Allie's tip about pulling a piece to transparency and... it just didn't work. Any of the several times I tried it. So after about 10 minutes of mixing I just moved on - I removed the mixer bowl, covered with plastic wrap, and popped it in my storage closet for 4 hours (you have to get creative with space in NYC).


I didn't take a Before picture, so this After picture means nothing to you. The original dough was about the size of a large grapefruit. This EXPLODED over the four (maybe 4.5 oops) hours it was hiding in the closet.


This is what happened when I tried to take it out of the bowl. Stretchy and yeasty. I went weak in the knees. Once recovered, I rolled the dough around on my lightly floured countertop and shaped it into a ball. I wiped some olive oil all around the inside of a Dutch oven and plopped the dough ball inside. I covered it and let it hang out for another 30 minutes on the countertop.


I heated the oven to 450° and inspected the bread. I took Allie's suggestions and drizzled olive oil on top after scoring an X in the dough. I skipped the salt figuring that the olives inside would add enough saltiness. You pop the lid on that Dutch oven and the Dutch oven into your oven for 30 minutes. At that point, turn the oven down to 375° and take the lid off. Let it bake at that temperature for 10 - 15 minutes until the crust turns the color you imagine all fresh bread should have.


Your entire kitchen smells like warm, fresh bread with aromas of rosemary. You knock on the top of it - it sounds hollow, as They say it should.


Sweet baby Jesus (or, SBJ, if you’re into possibly blasphemous acronyms). It's everything I wanted it to be and more. The edges are perfectly crusty and chewy, but the inside tastes like I put yeast and flour into a cotton candy machine. It was fluffy and airy and yeasty and FULL OF GLUTEN. Sorry to those of you who are Celiac and g-free, I'm not gloating, I'm just SO EXCITED about fresh bread.

This loaf is also massive. Of the two halves you see, I immediately sliced one of them up and popped it in the freezer (after cooling on the counter for a bit).


I ate my first piece fully unadulterated, warm from the oven, plain. J of course drizzled some olive oil onto a plate and... I ended up dipping into it a bit. Bread and olive oil is better than peanut butter and jelly and I love me a good PBJ.

This recipe of Allie's is unbelievably easy and delicious and can now say that baking fresh bread is my new favorite thing. I love it so much that I've done it exactly.... zero times since this experiment, but we're not really big Slice Of Bread eaters. But we ate LOTS of this bread with great delight when it was fresh. The frozen second half of this glorious loaf is slowly but surely dwindling as I grab a slice here or there for avocado toast breakfasts. And yes, if you're wondering, olive rosemary avocado toast is that much better than plain bread toast.

Chardonnay Beyoncé Love Chicken

Friday, September 5, 2014

Some of the best and not-screw-up-able recipes I've ever made come from Samma at Spice and Sass. From casseroles to soups to main dishes, every single thing I've made of hers is spot on.

One that I've made time and time again has the best recipe name in this history of recipe names.

Chardonnay Beyoncé Love Chicken


Disclaimer: no Beyoncés are harmed in the making of this dish. But dammit if I don't shake my caboose to some "Get Me Bodied" while cooking it.

If you're ever in the mood for something decadent but easy - say, a Friday night after the longest 4-day work week in history - then CBLC is perfect for you. The ingredients are:

- chicken breasts (but I'm sure dark meat would be bombtastic as well)
- 6 - 8 slices prosciutto or thinly sliced Italian ham
- 4 - 6 slices Provolone cheese
- 1 can cream of chicken soup (I grab the lowest sodium version)
- at least 1/4 cup of The Blessed Chardo (or whatever white wine you enjoy/are drinking at that moment/have on hand)
- paprika, salt, and pepper

The assembly is extremely complex, so pay attention. Put your chicken into a baking dish and season with salt and pepper. Lay the prosciutto or ham on top of the chicken making sure that the whole breast is covered. Then lay provolone slices on top.


Yes, that is Samma's blog up on my iPad in the background. And I my glass of chardonnay. I needed both to make sure I execute these steps in the correct order. Are you still with me? It's very complicated but just re-read that last paragraph, or I can sum up: plop, season, layer, layer. You're almost done.


Whisk the wine and soup together and pour it over the chicken. Sprinkle with paprika - I like hot paprika for this recipe but sweet paprika would also work.

Then you bake it uncovered at 350 degrees for 40 minutes or so (a little longer if you use leg meat).


It is so easy to make and it is even easier to make it disappear from your plate and into your stomach. The creamy sauce and gooey cheese on top of salty prosciutto and tender chicken? This is Decadent Weekend Relaxation Food in under an hour.


Samma suggests serving it with broccoli and if it ain't broke, don't fix it. I tossed the florets with a drizzle of oil, salt and pepper, and roasted them in a separate dish next to the chicken for the last 10 - 15 minutes. This dish is consistently a hit at my table and I promise it will be one at yours, too!

Maple Roasted Beet Salad

Wednesday, September 3, 2014

Beets. People love them or people hate them. If you hate them, skip to the bottom for the zucchini fritters. If you love them, you are in for a mapley, cheesy treat.

I found this recipe in my RINO cookbook and knew instantly that I wanted to try it. I cook beets frequently, especially in colder months, and usually I roast them in the oven. I've never boiled them first, so this recipe was a first to that end. It asks that you boil 4 large beets for an hour (the water turns hot pink, then dark pink, then kind of black-ish -- it's pretty cool to see). Once they're boiled, rinse them in cold water and let them cool down a bit on a board. When they're cooled down enough to touch comfortably, you should be able to peel the skin off by just rolling the beets around in your hands.

Then, slice the beets with a knife or mandoline and lay them out on a sheet pan. Drizzle maple syrup (about 4 tablespoons) on top of each and then sprinkle a bit of large-grain salt. Bake at 375 degrees for 8 - 10 minutes until the syrup soaks in and the beets appear dry.


While I let them cool a bit, I made Smitten Kitchen's zucchini fritters. I love these. They are very simply seasoned and very simple to prepare. They really let the fresh zucchini flavor and texture shine and they are so versatile as a side dish.


I plated the beets on fresh kale leaves and topped them with crushed walnuts (I had Brazil nuts - I love how mild and creamy they are) and crumbled goat cheese (J prefers feta so we went with feta). I also drizzled on some honey Dijon vinaigrette, also from RINO. I was actually supposed to swap the honey with maple syrup to 'match' the beets, but realized this halfway through making it and went with the original. The ingredients are:

2 1/2 tbsp Dijon mustard
2 1/2 tbsp honey (or maple syrup)
1/2 tsp black pepper
1/2 tsp salt
1/2 tsp oregano
3/4 cup olive oil
1/4 cup apple cider vinegar

It's tangy and delicious.


I also cooked some pork chops. They are nothing to write home - or a blog post - about. Seasoned, seared, baked while the beets cooled. I topped those with some of the vinaigrette, too.


The beets are great. The hour of boiling softened them so perfectly (versus my usually crispy roasting) and those few minutes in the oven really let the maple flavor permeate. You'd think that sweet maple syrup on top of sweet beets would be too much, but they really enhanced each other. The vinaigrette really cut through a lot of the sweet - the spice of the Dijon and the bright tang of the apple cider vinegar were perfect. Plus, the coarse salt on the beets themselves was a great addition.

All in all, this is a fantastic side dish. If you want to cut down on time, you can certainly buy pre-roasted beets, but the nut-cheese-beet-greens mix cannot be beet... or, beat.

I know, that was terrible, but I can't help it.
Pin It button on image hover